
Smith Robotics
Props, Models, Animatronics and more!
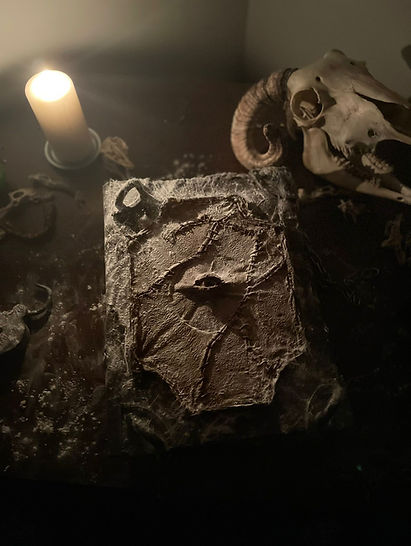
Student Film Witch Book Props
Type: Book/ Set prop
Start/End: 2025 - 2026
At Uni for my Action Props module, there needed to be some props made for a second year student film "When the clock strikes 12", essentially about a 1600 witch haunting a 1950s cinema.
The fellow students needed two witch books, one with a functioning eye and the other to open up as a book.
They needed a separate book for the witch hunter, a functioning lock and a safe door.


We started by going over some concept designs and ideas on both my end and their end of what they needed and how it was going to be practical for close up shots and how it will be handled by the actors.
Some of the ideas included:
- A human eye, with some fake skin.
- Chans to be placed around the book.
- Pages with writing and drawings inside for close up shots and for actors to look at.
- There was one version which was going to light up from the inside, but due to the time constraints and practicality we decided not to make that version.
During this time the concept for the book and even the lock mechanism was made on Adobe Illustrator, then made into a 3D model on Blender to visualise them more clearly. I then needed to make a prototype book, one which was smaller for material costs, as it was the first book I have made. The materials were found on either Amazon or Boyes.


I had watched a tutorial on book binding and applying the cover, it needed to feel real as if it was made in 1600s. The type of paper is rag paper and for the cover it was a fake leather, which is hard to work with. The paper binding has to be the easiest part of it all.
Once it was made it was time to test to see how different materials will work with it such as plastic and metals. Since it was a prototype it was going to be battered around and torn up, adding an acrylic wash dirty it up a bit with adding real rust.


Once that was done and we knew what was needed for the final book, it became easier to make it. This time bigger (A4 size), I changed the binding a bit so in some scenes it was easier to tear pages out for the actors that needed too. The only problem with it was the spine, as it is a little weak.
During this time the eyes were made from a 3D model that was then painted and coated in resin to give it a realistic look to them, some of the best eyes I have ever made so far.


An eye mechanism for the other book was made too, this would have a hinge lever that the actors or myself as a puppeteer can use.
For the fake skin it would be contained in its own space, rather than being covered all around the book. I did attempt to make my own as a prototype from latex, however, it did not come across as skin. Still a learning curve but not quite right.
With the help of one of my fellow students they did a terrific job on creating the fake skin, just amazing with how it looks. They did this by making a silicone mould with all the textures and details needed, then added layers of latex and using alcohol paints. We needed two of course since there are two versions of the book.


For the scenes in the 1950s cinema, the book needed to age a few hundred years. I used the techniques from the prototype book and added to this one with ripping and scratching pieces of the leather, darkened the skin in patches and with fake dry blood. The pages were coated in coffee one at a time. I used a hot glue gun to add the cobwebs and talk powder for the dust. Which really makes it more beliavble

The lock for the book was made on Blender and 3D printed in various sizes to see which one would fit. It has a working internal locking system with a key that can open it.
It was then painted to look like metal and with some aged effects with the chains to hold the book shut.
The Witch Hunters book was based on a more traditional journal, as to show the difference in classes of the witch and the hunter.
The last piece of this project that was asked of us to make was the safe door. With help from one of the technicians, we measured the size of the hole, 3D modelled it with a latch and dial. Using a large wooden board the pieces were painted, glue onto the board and then finally test fitted in place. With some details o withering.


